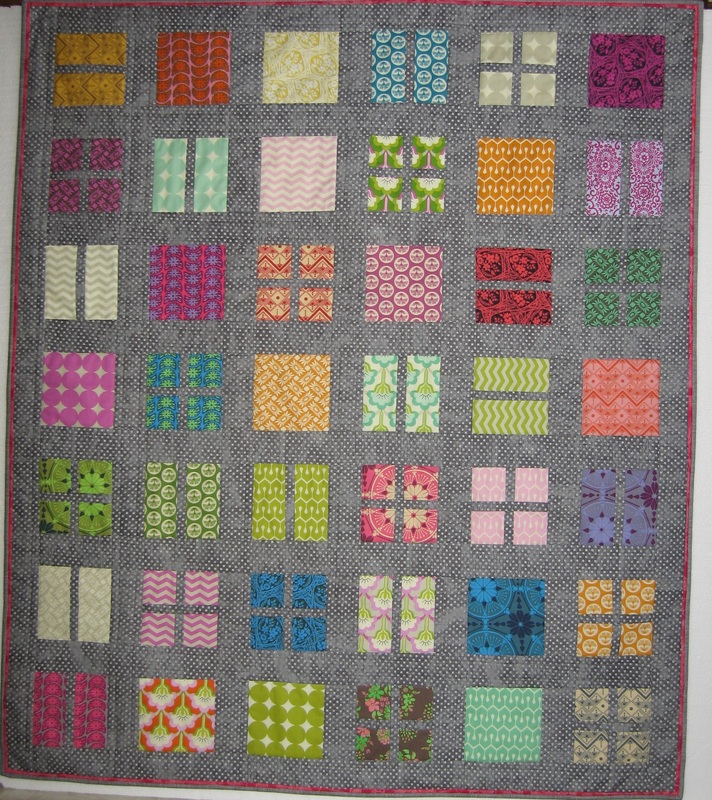
CITY BLOCKS QUILT
Special Introduction as a free pattern at the Hands All Around Quilt Guild Quilt Spectrum 2014
41 ½”x 48”
By Cheryl A. Adam (copyrighted)
This is an easy quilt to construct using 5”squares, 1” and 2 ½” strips. The size can easily be adjusted by adding more rows of blocks. I added piping with no guts on the edge of the quilt to add a little visual interest. Easy to add this custom touch.
Hope you enjoy making your version of this quilt.
Cheryl A. Adam
Fabric Requirements
Yardage Fabric Cutting Instructions
1 5/8 yd Grey Qty 15- 2 ½”x WOF from 7 of these strips cut-
Qty 49- 2 ½”x 5”
Qty 6- 1”x WOF from these cut-
Qty 42- 1”x 5”
Qty 5- 2”x WOF for binding
42- 5”x 5” Various-your choice If you purchase charm packs there is no cutting-
If you cut your own you will need 42-
5” squares.
1/3 yd Pink Qty 5- 1”x WOF
2 yds Backing fabric Qty 1- 54”x WOF
Qty 2- 6 ½”x WOF48”x 54”
48"x 54" Batting
Notes:
WOF= width of fabric
All seams are ¼”.
Making the blocks
- Take you 42- 5” squares and set 14 of them aside.You need to do nothing with these.
- Take the remaining 28 and cut them in half.Sew a 1”x 5” grey strip in the center of each.Press and set 14 of these aside.
- Take the remaining 14 and cut them in half a second time, in the opposite direction.Sew a 1”x 5” grey strip in the center of each.Press.
- All blocks from steps 1, 2, and 3 will measure 5”x 5”.
- Using the photo as a guide, arrange the blocks on a design wall.Place a 2 ½”x 5” between each block and at the beginning and end of each row.You will have 7 rows with 6 blocks and 8 pieces of grey sashing in each row.
- Sew the rows together and press.Return them to the design wall.
- Take the 8- 2”x WOF grey strips and trim them to 41 ½”.Place these strips between each of the rows of blocks and the top and bottom ofthe quilt.
- Sew the rows together and press.
Finishing - To make the back, first take the qty 2- 6 ½”x WOF strips and sew them together lengthwise to make one long strip.
- Sew this strip to the 54” side of the remaining pieces of backing fabric.Trim off the excess 6 ½” strip.
- Layer the backing, batting, and quilt top.Quilt by hand or machine, as desired.
- Take the qty 5- 1”x WOF pink strips and sew together lengthwise to make one long strip.Press this in half to make a ½” wide strip, wrong sides together.
- Align the raw edge of the right side of the quilt with the raw edges of the pink strip, one side at a time.Trim to length and baste in place near the edge of the quilt.Repeat with the remaining 3 sides of the quilt.
- Sew the binding strips together to form one long strip.Fold the binding in half, lengthwise, with wrong sides together and press.Sew the raw edges of the binding to the edges of the right side of the quilt.Turn the folded edge of the binding to the back side of the quilt and stitch in place by hand, mitering the corners.
Please feel free to make these quilts but remember these patterns are for your personal use only.
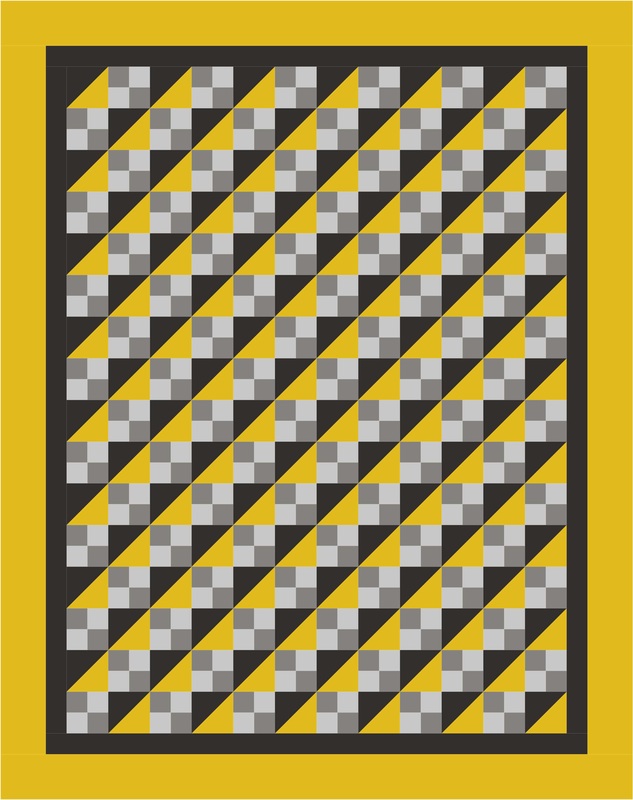
SUNNY DAYS AND BLACK NIGHTS QUILT
45 1/2"x 57 1/2"
This quilt can be cut using the dies listed below or you can use your rotary cutter. If you use a rotary cutter, the adjustments are listed below.
Dies Used
3 1/2" strips
3 1/2" half square triangles (unfinished)
2" strips
Fabric Requirements
Yardage Fabric Cutting Instructions
2 1/4 yds Yellow Print Qty 96- half square triangles -A
Qty 5- 3 1/2" x WOF strips
Qty 5- 2" x WOF strips (for binding)
1 1/2 yds Black Print Qty 96- half square triangles-B
Qty 5- 2"x WOF strips
3/4 yd Gray Print Qty 10- 2"x WOF strips
3/4 yd White Print Qty 10- 2"x WOF strips
2 3/4 yd Backing Fabric Qty 2- 1 3/8 yd pieces
49 1/2"x 61 1/2" Batting
Rotary Cutting Adjustments
A-Cut qty 48- 3 7/8"x 3 7/8" of yellow print. Cut in half diagonally once.
B-Cut qty 48- 3 7/8"x 3 7/8" of black print. Cut in half diagonally once.
C-Take the long pieced strips of gray and white and cut into 2" segments. You will need Qty-192 2"x 3 1/2" pieced segments for the quilt.
Notes
All seams are 1/4"
WOF= width of fabric
LOF= length of fabric
Half Triangle Block Assembly
1. With right sides together, match the outside edges of a yellow and black half square triangle. Sew a seam on the long side. Press seam open.
2. Repeat step 1- 95 more times to make the half square triangle blocks. The blocks will measure 3 1/2" unfinished.
Four Patch Block Assembly
1. With right sides together, sew the long side of a 2"x WOF strip of gray print to the long side of a 2" white print strip. Press the seam towards the gray print.
2. Layer the fabrics across the 2" strip die and cut 2" gray/white segment. Repeat until you have 192 of these segments. C
3. Using the drawing of the quilt above, sew two segments together to make a four patch. Press the seams to one side.
4. Repeat step 3-95 more times to make the four patch blocks. The blocks will measure 3 1/2" unfinished.
Assembling the Quilt Center
1. Using 6 half square triangle blocks and 6 four patch blocks, sew together a row. You will be making 16 rows, half of them will start with the half square triangle and half will start with the four patch.
2. Alternating the two rows, sew all sixteen rows together to make the quilt center.
Adding the Borders
1. Sew the 2"x WOF strips of black together to make one long strip. Press.
2. Cut the strip into qty 2-2"x 48 1/2" and qty 2-2"x 39 1/2".
3. Sew the 2"x 48 1/2" strips to the long sides of the quilt center. Press.
4. Sew the 2"x 39 1/2" strips to the top and bottom of the quilt center. Press.
5. Sew the 3 1/2"x WOF strips of black together to make one long strip. Press.
6. Cut the strip into qty 2-3 1/2"x 51 1/2" and qty 2-3 1/2"x 45 1/2".
7. Sew the 3 1/2"x 51 1/2" strips to the long sides of the quilt center. Press.
8. Sew the 3 1/2"x 45 1/2" strips to the top and bottom of the quilt center. Press.
Finishing
1. Sew the two, 1 3/8 yd pieces together along the selvedge edge to make the backing.
2. Layer the backing, batting, and quilt top. Quilt by hand or machine, as desired.
3. Sew the 2" yellow print binding strips together to form one long strip. Fold the binding in half, lengthwise, with wrong sides together and press. Sew the raw edges of the binding to the edges of the right side of the quilt. Turn the folded edge of the binding to the back side of the quilt and stitch in place by hand, mitering the corners.
